Did you know that during the winter holidays, families across the American Southwest and Mexico collectively make hundreds of millions of these cherished bundles? This dish is more than a meal; it’s a powerful tradition that connects generations.
Welcome to the wonderful world of homemade tamales. This beloved Mexican dish brings families together during special celebrations. It creates memories that last for generations.
Our comprehensive guide walks you through every step of making authentic tamales from scratch. We break down what might seem like an intimidating process into manageable, easy-to-follow stages. Making them at home is absolutely achievable, even for beginners.
The key to success is proper planning and preparation. You will discover that breaking up the work over a couple of days makes the entire process stress-free and enjoyable.
These delights feature tender, slow-cooked shredded beef combined with a rich, flavorful red chile sauce. The filling is wrapped in soft masa dough and steamed inside corn husks until perfectly cooked.
Whether you are continuing a family custom or starting a new one, this recipe delivers an authentic flavor and a tender texture. That homemade touch simply cannot be purchased from a store.
You will learn professional tips and tricks passed down through generations. We cover everything from selecting quality ingredients to testing the masa consistency. This ensures your results are delicious every single time.
The process may take some time, but the reward is absolutely worth it. Unwrapping a warm, steaming homemade creation you made with your own hands is a moment of pure pride.
Key Takeaways
- Making tamales at home is an achievable project for cooks of all skill levels.
- Proper planning and splitting the work over multiple days is the secret to a stress-free experience.
- The result features a flavorful shredded beef filling wrapped in soft masa.
- This guide provides authentic techniques to ensure delicious results every time.
- The rewarding feeling of enjoying a homemade tamale is worth the time invested.
- You’ll gain skills to start a new and meaningful family tradition.
Ingredient Essentials for Authentic Tamales
The soul of an unforgettable tamale lies in the quality of its core components. Each element, from the meat to the wrapper, plays a vital role in creating that memorable, homemade flavor.
Selecting the right ingredients is your first step toward success.
Key Ingredients Overview
Your shopping list centers on a few essentials. For the filling, a 3 to 6-pound chuck roast or brisket is ideal. These cuts become incredibly tender and flavorful after slow cooking.
The dough starts with masa harina, a special corn flour. Look for bags labeled “for tamales” for the best texture. High-quality lard is also crucial for a light, fluffy masa.
Don’t forget the dried chiles—guajillo, ancho, and puya—for a rich, complex sauce. Aromatics like onion, garlic, and oregano build depth in both the broth and the sauce.
Quality Standards for Corn Husks, Masa, and Beef
Your corn husks should be clean, dry, and flexible. You’ll need more than the number of tamales you plan to make, as you’ll select the best, largest husks for wrapping.
When choosing masa, opt for reputable brands. Avoid lower-quality options that can lead to dense results. The right lard makes an enormous difference in both texture and taste.
For the beef, well-marbled cuts are key. They shred beautifully and stay moist. Season the meat generously with salt, pepper, and spices as it simmers.
The reserved cooking broth is a secret weapon. It adds incredible flavor to both the masa dough and the chile sauce, tying the whole dish together.
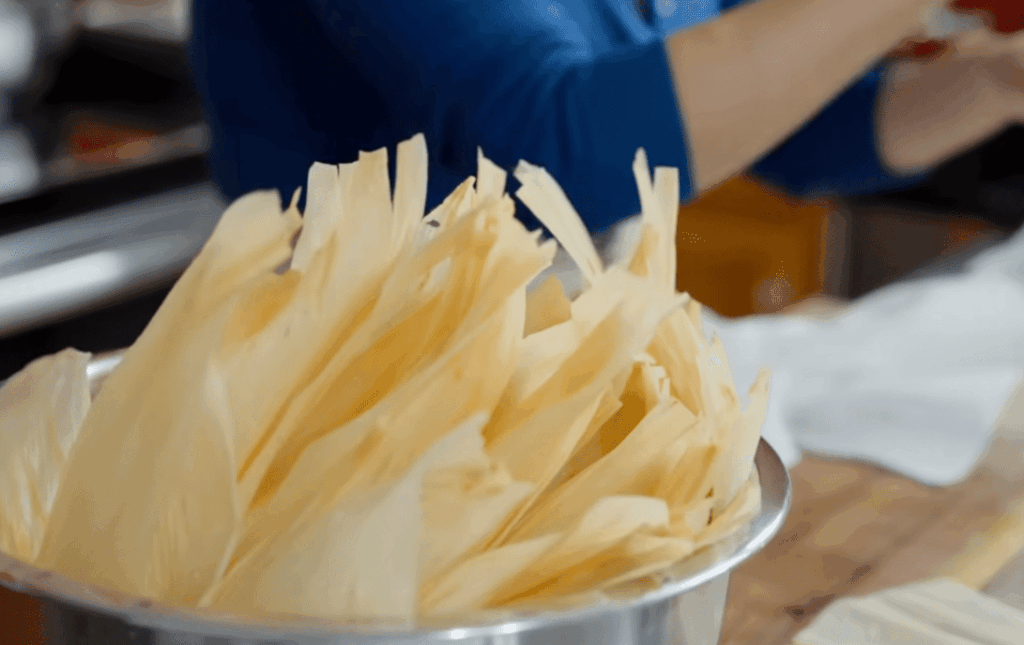
Soaking and Preparing Corn Husks
Properly prepared wrappers are the unsung heroes of successful homemade cooking. These dried corn husks create the perfect steam environment while keeping your masa moist.
Selecting the Best Corn Husks
Start with high-quality dried husks from reputable suppliers. Look for bags that are clean and flexible. Avoid any with tears or discoloration.
You’ll need more corn husks than you plan to use. This allows you to choose the largest, most perfect ones for wrapping. Save smaller or torn husks for other purposes.
Proper Soaking Techniques
Rinse your corn husk selection under cold running water. This removes dust and any remaining silk. Then submerge them completely in very warm water.
Use a heavy bowl to weigh down the husks so they stay underwater. Soak for at least 30 minutes until pliable. The corn wrappers should bend easily without cracking.
Keep unused husks in hot water during assembly. Place ready-to-use ones on a damp towel to prevent drying. This ensures every corn husk remains flexible.
Remember to reserve imperfect husks for lining your steamer. They work perfectly at the bottom and top of your cooking arrangement.
Mastering the Art of Masa
The foundation of every exceptional corn-husk creation lies in mastering the art of masa preparation. This specially prepared corn dough provides the distinctive flavor and tender texture that makes homemade versions absolutely irresistible.
Types of Masa and Their Benefits
You’ll find three main options when you make masa. Pre-seasoned preparada offers convenience. Regular masa requires your own seasoning. Masa harina, an instant corn flour, provides consistent results with simple hydration.
Preparing your dough a day ahead breaks up the workload. This smart strategy ensures everything is ready when assembly time arrives.
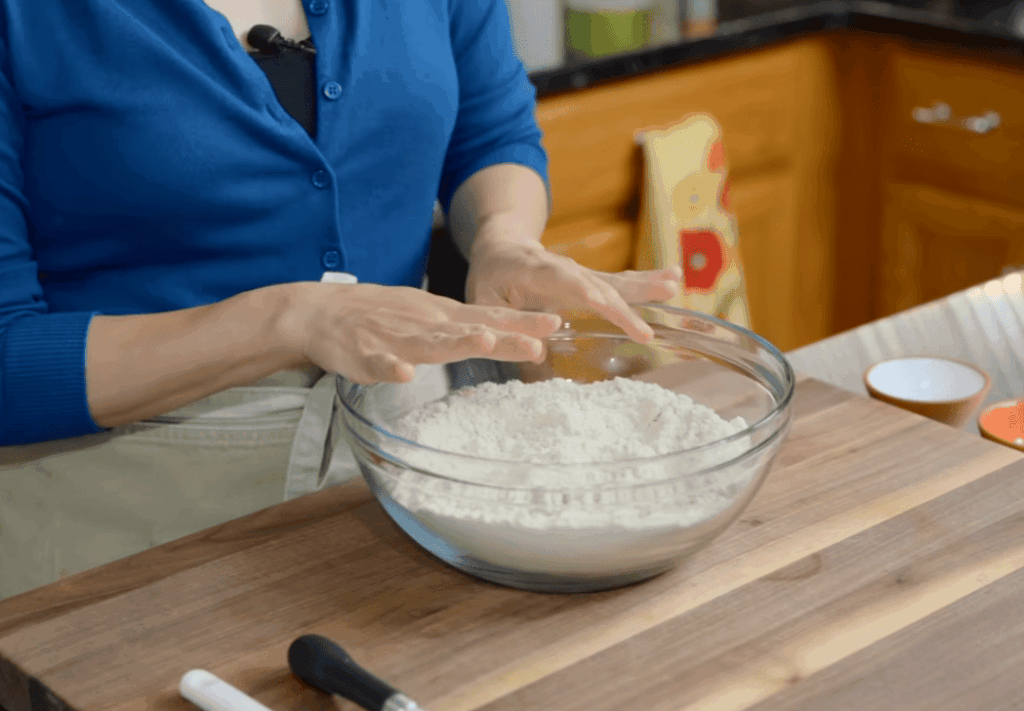
Mixing, Testing, and Achieving the Perfect Consistency
Start by beating lard in your stand mixer until pale and airy. Add dry ingredients like masa harina, salt, and baking powder in stages. Gradually incorporate warm beef broth and oil to prevent clumping.
The float test is crucial for perfect dough. Drop a small piece into cold water. If it floats, your masa is ready. If it sinks, beat in more fat.
Your finished masa should spread smoothly like thick hummus. Store it covered in the refrigerator for up to three days. Bring it to room temperature before use.
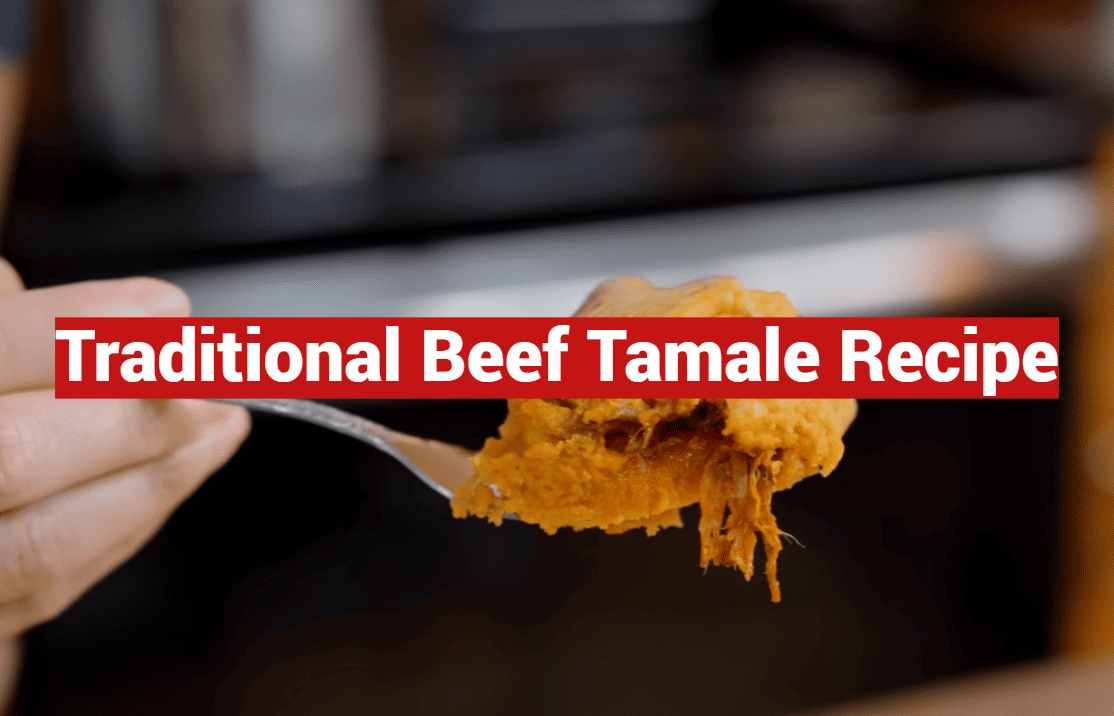
Traditional Beef Tamale Recipe: Beef Filling and Seasonings
This stage focuses on developing the deep, satisfying flavors that will become the soul of your homemade bundles. The rich, savory center combines tender slow-cooked meat with a complex chile mixture.
Simmering and Shredding the Beef
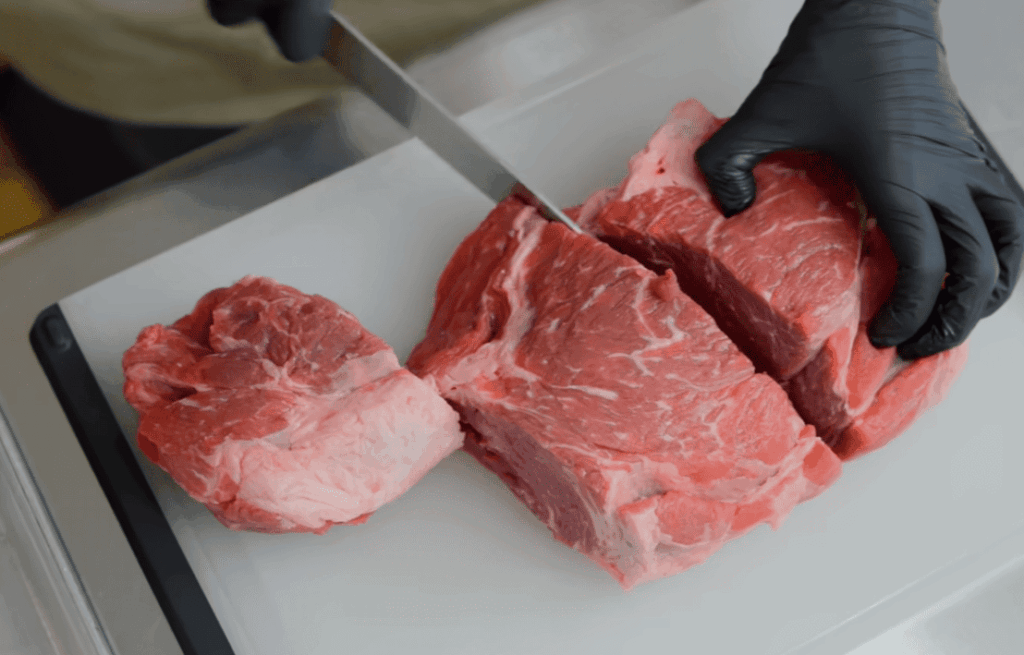
Start with 3-6 pounds of chuck roast or brisket. Cut the meat into large square pieces for faster cooking. This makes shredding much easier later.
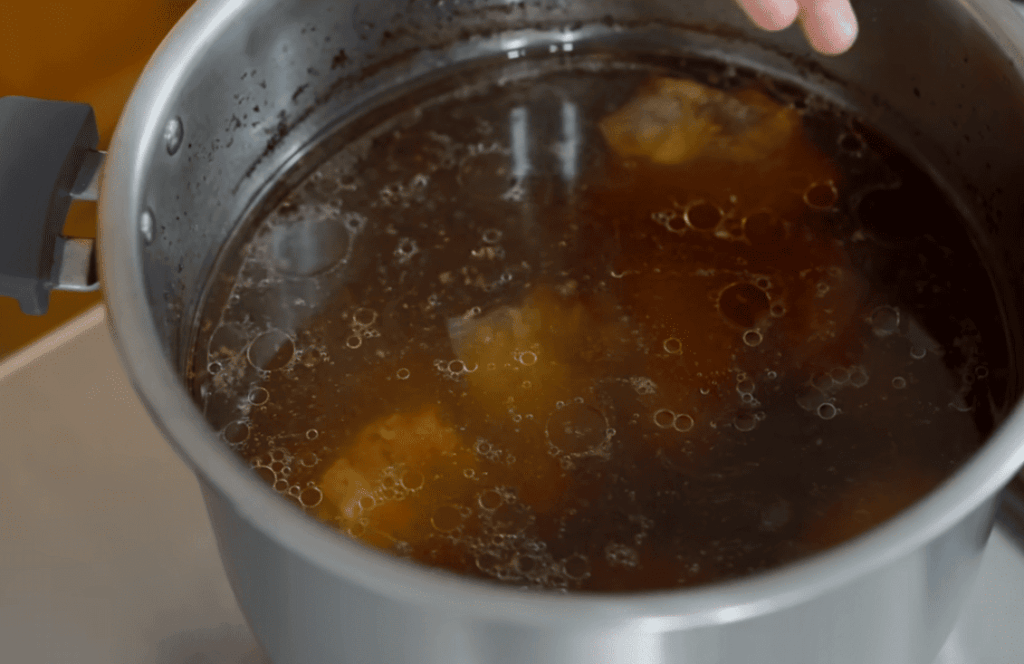
Season generously with salt and pepper. Sear all sides in hot oil until deeply browned. This crucial step creates rich flavor and a colorful broth.
Simmer the meat for 2½-3 hours in a large pot. Add water, onion, whole garlic cloves, and spices. Cook until fork-tender and easily pulled apart.
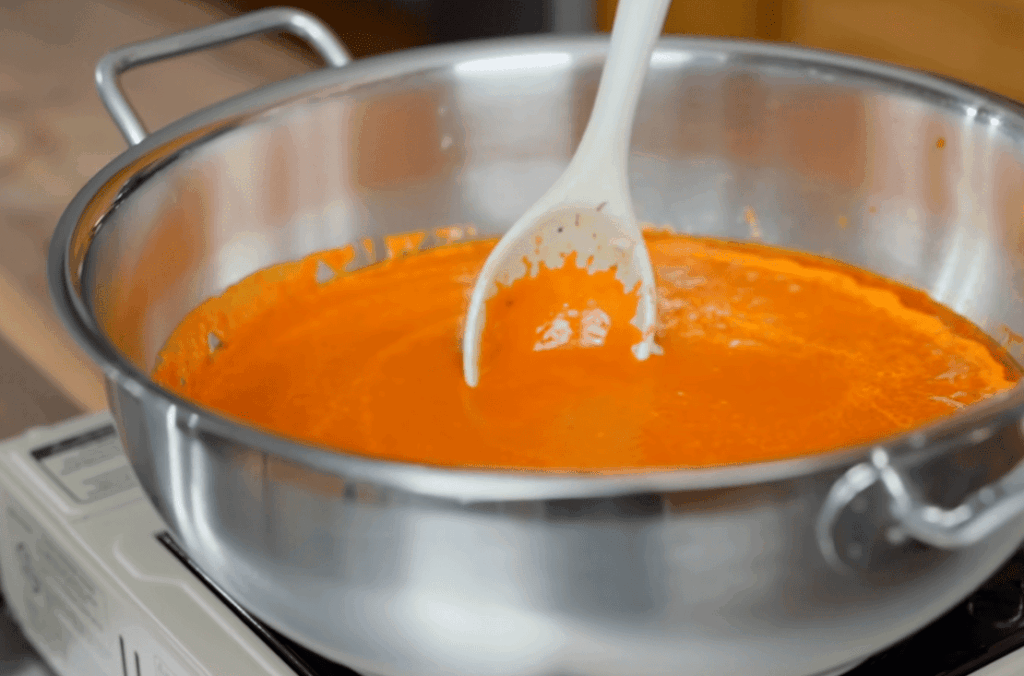
Creating a Rich Red Chile Sauce
While the meat cooks, prepare your red chile sauce. Remove stems and seeds from dried chiles. Toast them briefly with sautéed aromatics.
Cover the toasted chiles with reserved beef broth. Let them hydrate for 10-15 minutes until completely soft. Then blend into a smooth, rich sauce.
Fry the sauce in hot oil for 10-15 minutes. Stir frequently until it thickens and deepens in color. This intensifies the flavors beautifully.
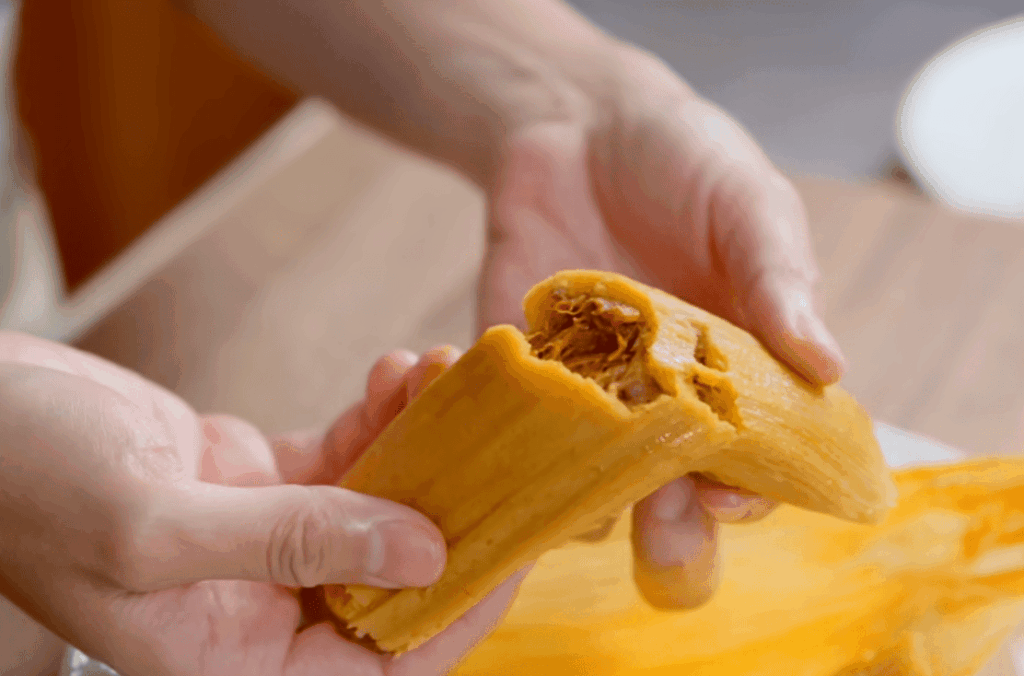
Combine the shredded meat with the fried chile sauce. Simmer together for several minutes so the flavors meld completely. The result is a moist, deeply seasoned filling that’s absolutely delicious.
Assembling Your Tamales: Wrapping and Folding Techniques
This hands-on stage brings together all your components in a rhythmic process that becomes second nature. With your prepared masa and flavorful filling ready, you’ll create perfectly wrapped packages.
Even Spreading of Masa on Corn Husks
Place a damp corn husk on your palm with the smooth side facing up. This surface provides the ideal canvas for spreading. Use about ⅓ cup of masa for each husk.
Spread the masa into an even layer approximately 3 inches wide. Leave about 2 inches empty at the pointed top. This space is crucial for proper folding later.
Folding Techniques for a Secure Seal
Place your filling down the center of the masa layer. Leave adequate space on both sides to prevent leakage. Bring the long sides of the husk together firmly.
Fold the empty bottom section upward to create a tight base. Then fold the narrow top downward, tucking it underneath. This multi-step process ensures a secure seal.
The repetitive motion of assembling becomes almost meditative—a rhythm of spread, fill, and fold that connects you to generations of home cooks.
| Common Issue | Cause | Solution |
|---|---|---|
| Filling leaks out during folding | Too much filling or masa spread too close to edges | Use less filling and leave ½-inch margins on all sides |
| Husk tears during wrapping | Corn husk not properly softened or too dry | Soak husks longer and keep unused ones in warm water |
| Tamale unfolds during steaming | Insufficient folding pressure or improper tuck | Press sides firmly together and ensure top flap is securely tucked |
Cover finished packages with a damp towel to prevent drying. Working with others makes this step enjoyable and efficient.
Steaming Your Tamales to Perfection
The gentle heat of steam works its magic in this final cooking phase. This transforms your carefully assembled packages into tender, fully cooked delights. Proper technique ensures perfect results every single time.
Setting Up the Steamer Correctly
Choose a large steamer pot that can hold your bundles standing upright. Add about one inch of water to the bottom, just below the rack. The water should never touch the food.
No specialty equipment? Improvise with a regular pot and heatproof bowl. Place it at the bottom and surround with extra corn husks. This creates a stable platform.
Line the rack with imperfect husks for protection. Arrange your packages upright in pairs, folded ends down. Pack them firmly but allow steam circulation.
The steady hiss of steam becomes a comforting sound, signaling your creations are transforming into something truly special.
Timing and Indicators of Doneness
Bring the water to a boil, then reduce to a gentle simmer. Cook for 75-90 minutes on average. Keep a kettle of hot water nearby to add water as needed.
Check if your tamales are done by testing one from the center. Let it rest for 10-15 minutes, then unwrap. The masa should peel away cleanly from the husk.
| Steaming Challenge | What’s Happening | Quick Fix |
|---|---|---|
| Soggy bottoms | Water level too high | Reduce water below rack level |
| Uneven cooking | Poor steam circulation | Rearrange bundles more evenly |
| Dry results | Water evaporated completely | Add hot water immediately |
When properly steamed, your creations will hold their shape beautifully. The texture will be light and fully cooked throughout.
Enhancing Flavor with Sides and Salsa
The final step in your culinary journey involves pairing your creations with vibrant sides and salsas. These accompaniments add exciting layers of texture and taste that make each bite unforgettable.
Choosing the right partners transforms your meal into a complete feast. Let’s explore the best options to serve alongside your homemade bundles.
Choosing Complementary Salsa and Garnishes
Fresh salsa is the classic topping for a reason. The bright acidity of a chunky salsa fresca cuts through the rich masa beautifully. A smooth salsa verde made from tomatillos offers a tangy alternative.
For more heat, try a red salsa using dried chiles. Creamy avocado salsa or guacamole provides a cool, rich contrast. A dollop of Mexican crema balances any spiciness perfectly.
Consider setting up a customization bar for your guests. Offer multiple salsa options, pickled jalapeños, and crumbled queso fresco. Fresh cilantro, lime wedges, and sliced radishes add fresh crunch.
| Salsa Type | Primary Flavor | Best Pairing | Texture |
|---|---|---|---|
| Salsa Fresca | Bright & Acidic | Rich Beef Fillings | Chunky |
| Salsa Verde | Tangy & Herbaceous | Chicken or Pork | Smooth |
| Red Chile Salsa | Smoky & Spicy | All Protein Types | Variable |
| Avocado Salsa | Creamy & Mild | Spicy Fillings | Silky |
Traditional Mexican beverages make wonderful companions. Atole de Elote, a warm sweet corn drink, is particularly comforting. Cafe de Olla with cinnamon and piloncillo adds warmth to holiday meals.
These same assembly techniques work for other proteins too. Try them with tender pork or shredded chicken fillings. Vegetarian options like cheese and jalapeño are equally delicious.
The right sides and salsa elevate your entire eating experience. They add complementary flavor that makes your homemade tamales truly spectacular.
Planning Ahead: Prepping and Storing Your Tamales
Smart planning is your secret weapon for making the entire process feel relaxed and social. By spreading the work over several days, you transform a big project into a series of simple, enjoyable tasks.
This approach saves time and reduces stress, allowing you to focus on the fun part: assembling and sharing the experience.
Advance Preparation Tips for a Stress-Free Experience
Create a simple timeline. Prepare your meat filling and chile sauce up to four days ahead. Make your masa dough up to three days in advance.
Soak your corn husks overnight. On assembly day, just bring the chilled masa to room temperature. This makes spreading much easier.
Gathering friends or family to help wrap turns a chore into a cherished memory. The communal spirit is what makes this tradition so special.
This flexible schedule works perfectly for other fillings, too. You can use the same method for delicious pork or savory chicken variations.
Storage, Reheating, and Leftovers
Once cooked and cooled, your creations store beautifully. Keep them in the fridge for 3-5 days. For longer storage, freeze them for up to six months.
Reheating is simple. Steam refrigerated bundles for about 15 minutes. If frozen, steam for 20-25 minutes until hot.
The flavors actually improve over time. Making a large batch means you’ll have a delicious homemade meal ready whenever you want one.
Culinary Insights: Regional Variations and Traditions
The culinary landscape of Mexico reveals a fascinating story through its diverse regional tamale traditions. These beloved bundles date back thousands of years to Aztec and Maya civilizations. They served as portable meals for warriors and travelers.
How Tamale Recipes Differ Across Regions
Across Mexico’s diverse regions, preparation methods vary dramatically. Experts estimate over 300 distinct varieties exist. Local ingredients, climate, and cultural influences shape each unique style.
Northern Mexican states like Durango favor certain meat fillings. This reflects the area’s strong cattle ranching heritage. Red chile sauces made from dried peppers are common here.
Central Mexico tends toward different protein options. These often feature either red or green sauces. Additional ingredients like olives or raisins appear depending on the specific area.
Oaxaca in southern Mexico uses aromatic banana leaves instead of corn husks. This imparts a unique, subtle flavor to the masa. Chicken with complex mole sauces is particularly popular.
| Region | Signature Style | Key Ingredients | Wrapping Material |
|---|---|---|---|
| Northern Mexico | Red Chile Meat Fillings | Beef, Guajillo Peppers | Corn Husks |
| Central Mexico | Mixed Protein Options | Pork, Olives, Raisins | Corn Husks |
| Southern Mexico | Banana Leaf Wrappings | Chicken, Mole Sauce | Banana Leaves |
| Vegetarian Varieties | Sweet and Savory Options | Beans, Cheese, Fruits | Corn Husks |
Beyond meat-filled varieties, countless vegetarian and sweet options exist. Countries like Guatemala and El Salvador developed their own distinctive traditions. Understanding these variations may inspire your own kitchen experiments.
Conclusion
Congratulations on mastering the art of creating these cherished Mexican delicacies from your own kitchen. You now possess the knowledge to craft homemade versions that capture the true spirit of authentic cuisine.
While the process involves multiple steps and takes some time, remember that breaking preparation over several days makes it manageable. The key elements are quality ingredients, proper masa consistency, and well-seasoned fillings.
Don’t worry if your first batch isn’t perfect. This skill improves with practice. Even imperfect creations made with care taste absolutely delicious.
You’re ready to start your own traditions. Share this recipe with loved ones and enjoy creating food that nourishes both body and soul. Your homemade tamales will create lasting memories around the table.